
Who says creating a magazine-worthy outdoor space has to break the bank? A DIY stepping stone pathway is proof that style and practicality can go hand in hand—without the hefty price tag. Not only does it add charm and character to your garden, but it lets you flex your creative muscles too. Whether you’re aiming for a rustic vibe or a sleek modern look, this project offers endless possibilities for personalization. So, why not transform your backyard with a pathway that’s as unique as you are? It’s easier than you think, and you’ll love the results.
Looking for a quick visual guide? Check out this video tutorial on making a stepping stone pathway—it’s packed with tips and inspiration!
Planning Your Stepping Stone Pathway
Bringing your dream garden pathway to life begins with a solid plan. If you’ve ever walked through a whimsical yard with meandering stepping stones, you know how transformative the right pathway can be. With a little forethought and attention to detail, you can create a design that is not only practical but also delightfully inviting.
Choosing the Best Location for Your Pathway
The first step? Picking the perfect spot. Ask yourself: What purpose will the pathway serve? You might need it to connect areas like a patio to your vegetable garden, or perhaps it’s to steer foot traffic away from delicate flowerbeds.
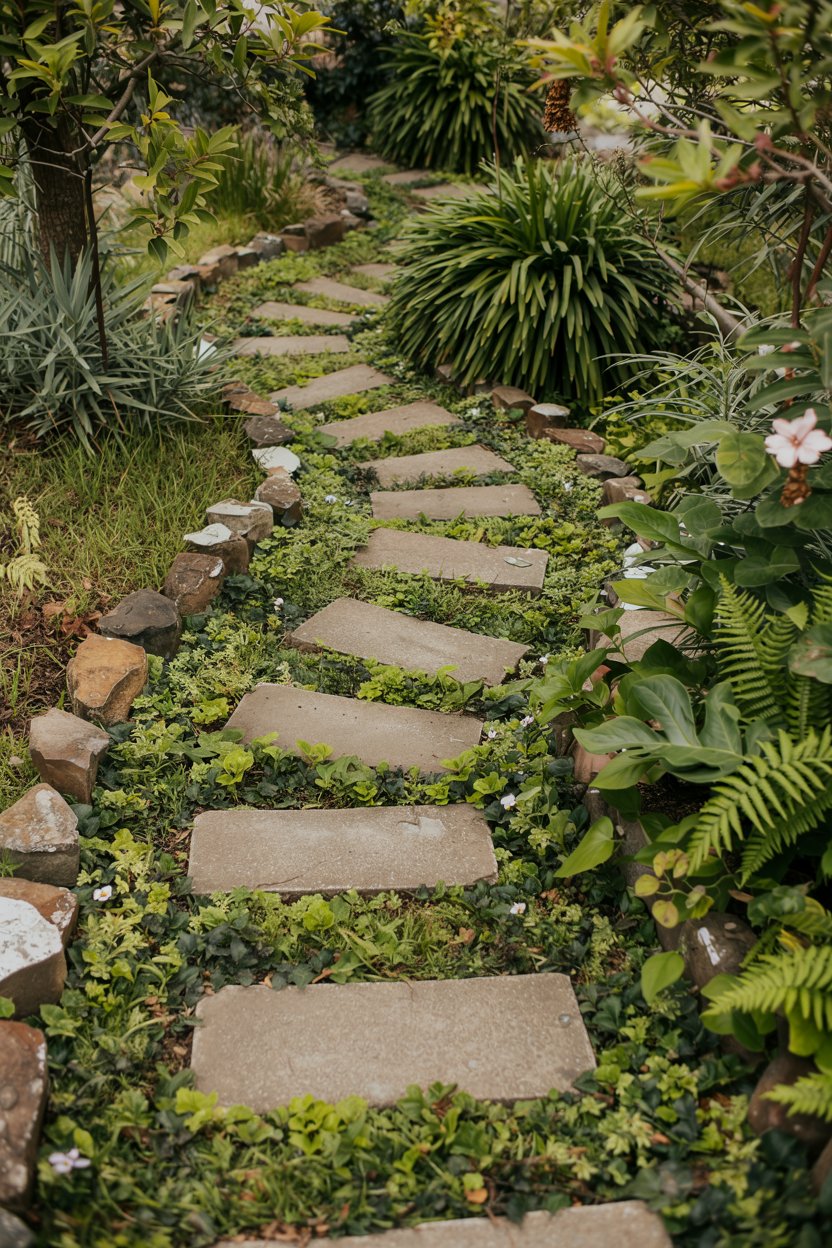
For aesthetics, consider the flow of your outdoor space. A pathway should feel natural, enhancing the yard’s overall vibe. An arched route leading toward a hidden corner adds mystery, while a straight path to the front porch radiates simplicity. Think about lighting, too—spots with dappled sunlight or interesting shadows will make your stepping stones pop even more throughout the day.
Designing Your Pathway Layout
Grab a pencil and paper (or even a garden hose for visualization)—it’s time to map out your path. Do you prefer clean, symmetrical lines, or are winding curves more your style? A straight path might suit a minimalist yard, while swooping bends can soften the look of a rigid outdoor layout.
Don’t forget to play with spacing! Uniform gaps between stones give a polished impression, but varied distances make a space feel playful and organic. You can even sketch out fun patterns, like zigzags or unique mosaics.
Selecting Materials for Your Stepping Stones
The type of materials you choose isn’t just about looks—it can make or break the project’s practicality. Natural stone like slate or flagstone offers timeless durability and blends seamlessly with almost any garden style. Concrete molds give you total control over shape and size, letting you DIY every detail. For those who love upcycling, repurposed items like old wood slices or antique bricks could add an extra layer of charm.
Take note of potential drawbacks. Some materials, like wood or untreated bricks, may wear faster in wetter climates, requiring regular maintenance. Stone, on the other hand, is low-maintenance but often pricier upfront. Think about your local weather and how much upkeep you’re willing to handle before making a decision.
Imagine
Picture this: A gently winding path carved through lush greenery, each stepping stone a mini masterpiece. Maybe they’re textured slabs dotted with moss, or they could be colorful hand-painted tiles reflecting your unique style. The walkway isn’t just a way to get from point A to B—it’s an integral part of your outdoor space’s personality. Anytime someone strolls through your garden, that pathway acts like a warm invitation to pause, explore, and admire everything you’ve created.
Step-by-Step Guide to Making Stepping Stones
Creating your own stepping stones is one of the most satisfying and rewarding DIY projects you can tackle. The process combines both creativity and practical skills, leaving you with a beautiful and functional pathway that’s uniquely yours. If you’re ready to make your outdoor space more inviting, here’s how you can do it.
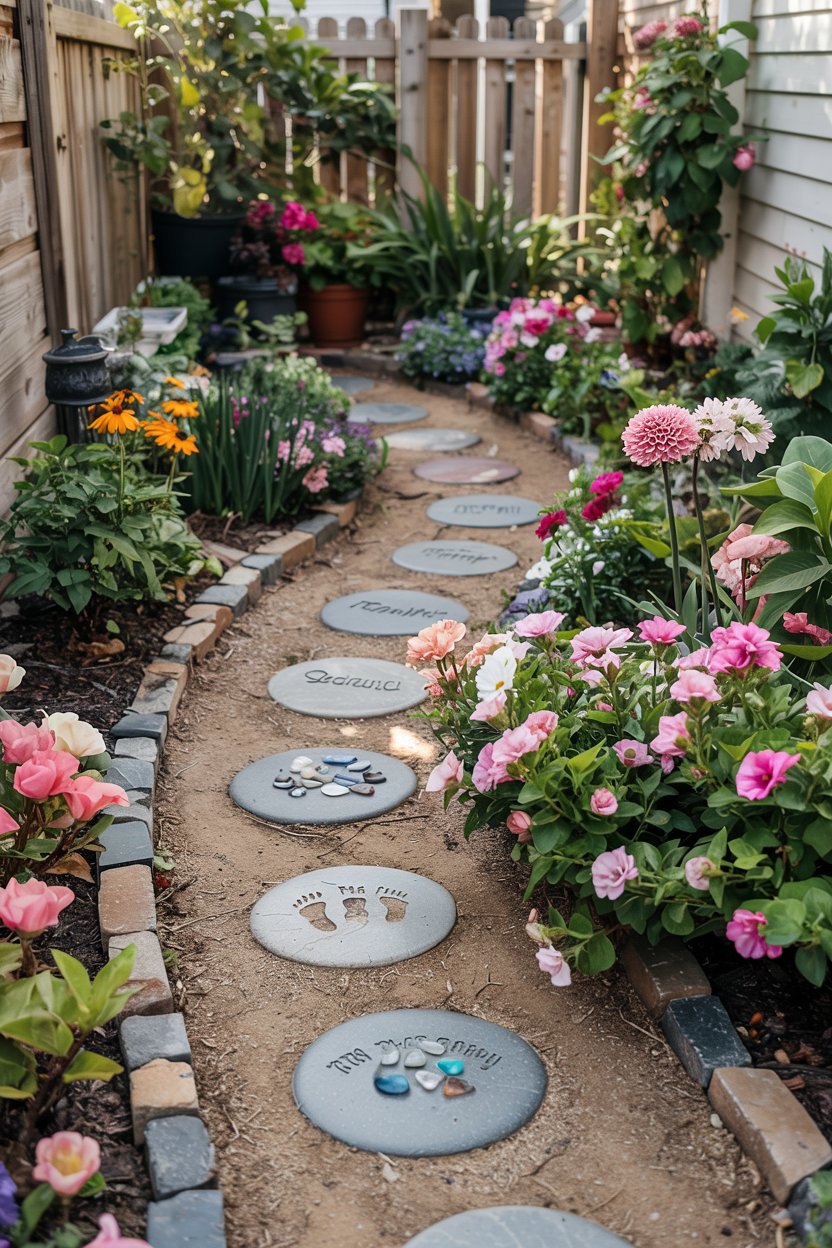
Creating Customized Stepping Stones
Making personalized stepping stones is simpler than you think. You’ll need concrete (pre-mixed works great), molds (think cake pans or specialty forms), and decorative elements like glass beads, shells, or mosaic tiles. Here’s a quick rundown of the process:
- Prepare Your Work Area: Set up outside or protect your workspace with a drop cloth. Concrete can get messy.
- Mix the Concrete: Follow package instructions to mix the concrete to a smooth consistency. A thick pancake batter is a good analogy.
- Fill the Molds: Pour the concrete mixture into your selected molds. Tap them gently to release air bubbles.
- Decorate: Let your creativity shine with decorations. Press in glass pebbles, carve names, or imprint leaves for natural textures.
- Let it Cure: Give your stones 24-48 hours to solidify before removing them from the molds.
Want even more creative ideas? Check out this guide on how to make garden stepping stones. It’s loaded with inspiration for unique designs.
Preparing the Ground and Setting the Pathway
The foundation of your stepping stone pathway is just as important as the stones themselves. Start by identifying where you want the path to go. Will it weave through a flowerbed, or lead straight to the shed? Once that’s settled, here’s what to do:
- Remove Sod and Level the Area: Dig out about 2 inches of soil where the stones will lie. Keep the base as level as possible.
- Add Base Material: A layer of sand or gravel provides drainage and stability. This prevents shifting and ensures your pathway stays functional.
- Plan Stone Placement: Lay out the stones before committing to placement. Test their alignment by walking the path and adjusting for comfort and balance.
For an in-depth tutorial on creating an inviting garden pathway, consider this DIY craft tutorial for stepping stones.
Securing the Stones in Place
No one likes a wobbly pathway, so securing your stepping stones is key. Depending on your setup, there are a few methods you can use to keep everything snug:
- Sand Bed: Place your stones into a compacted layer of sand, filling any gaps around the edges with more sand to lock them in.
- Edging Material: Use plastic or metal edging to frame the pathway, holding the stones in position.
- Mortar: For a more permanent solution, set the stones with mortar, keeping them rigid and immovable.
Each method has its pros and cons, but sand beds are often the easiest DIY for beginners while mortar provides the most durability.
Imagine
Picture this: A pathway that winds through your garden, framed by blooming flowers and perfectly spaced stepping stones. Each one tells a little story—one is embedded with sea glass from a family beach trip, while another features tiny imprints of the kids’ feet. The path is secure, functional, and undeniably personal, turning your yard into a dreamscape.
Who knew “stepping stone pathway DIY” could inspire such magic in your backyard?
Maintenance and Enhancements for Longevity
A beautifully laid stepping stone pathway is an anchor point in any garden, but without proper care, even the best-laid stones can lose their luster. Maintenance is the key to extending the life and aesthetics of your pathway, while thoughtful enhancements can take it to the next level. Here’s how to keep your DIY project looking fresh and functional for years to come.
Regular Pathway Maintenance Tips
Neglecting pathway care can lead to weeds sprouting up between stones or stones shifting from their original positions. Thankfully, keeping your garden trail in top shape doesn’t have to be laborious. A few simple practices can save you time and effort in the long run:
- Weed Control: Use polymeric sand to fill the joints between stones; it hardens with water and discourages weed growth. Another option is to apply natural weeding solutions like vinegar-based sprays.
- Pressure Washing: Over time, dirt, algae, and moss can dull the appearance of your stones. A quick pressure wash can remove built-up grime and restore their original beauty.
- Stone Realignment: If stones begin to wobble, reset them by leveling the base underneath and adding more sand or gravel where needed.
- Sealants for Protection: Apply a stone sealant to enhance durability and prevent moisture damage, especially in wet climates.
For additional pathway care ideas, check out this guide to keeping your outdoor pathways clean and safe for practical tips.
Adding Landscaping Touches Around the Pathway
Why stop at just the pathway? Surrounding the stones with thoughtful landscaping will elevate the entire garden, making it feel like a cohesive masterpiece. A few elements can instantly brighten and polish the space:
- Flowers and Greenery: Plant colorful flowers like petunias or creeping phlox around the edges for bursts of color. For a more understated look, ornamental grasses work wonders.
- Mulch Layers: Adding mulch around the perimeter not only helps suppress weeds but also gives the pathway a clean, finished look.
- Decorative Borders: Use bricks, stones, or timber to edge the path and define its shape and structure.
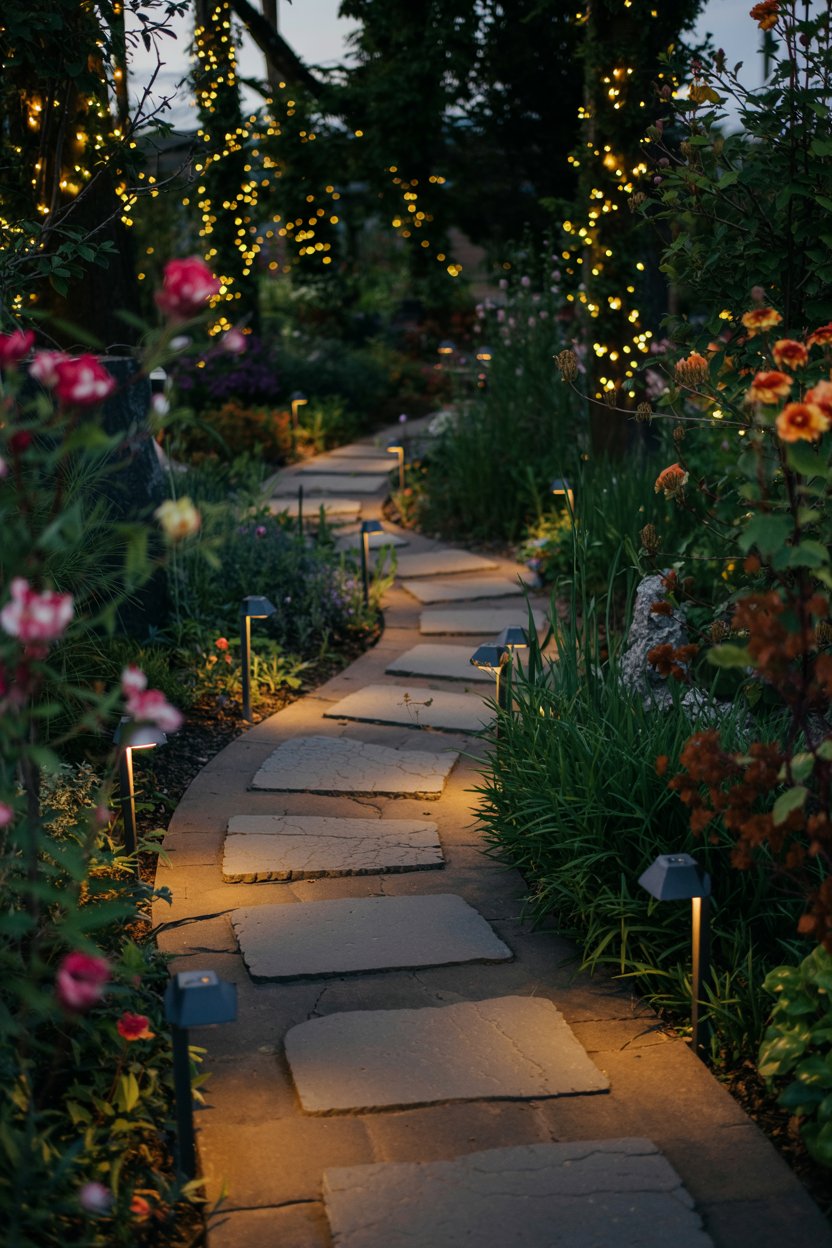
- Night-time Lights: Solar lights are an eco-friendly way to illuminate the pathway after dark. Whether you’re hosting a garden party or simply enjoying a peaceful evening, they create a warm and inviting ambiance.
Imagine
Picture this: As twilight falls, tiny solar lights flicker to life along a gently curving pathway. Lush greenery and vibrant flowers frame the trail, creating a living corridor that feels alive with energy. Each stepping stone stands stable and pristine, a testament to proper care and a little creative flair. This is no longer just a path—it’s a feature that brings joy every time someone takes a step.
Conclusion
A DIY stepping stone pathway isn’t just a project—it’s a piece of you reflected in your outdoor space. It ties together creativity, practicality, and a unique sense of accomplishment. Every step reminds you of the care and effort poured into creating something personal and lasting.
Beyond its charm, the pathway becomes a mix of beauty and function. Whether you want a visual focal point or simply a better flow for your garden, it’s the perfect blend of style and purpose. The satisfaction of walking on stones you designed and set is unmatched.
Why not take that first step? Your garden is waiting to tell a story that starts with you!